Twitter cards for Gatsby posts
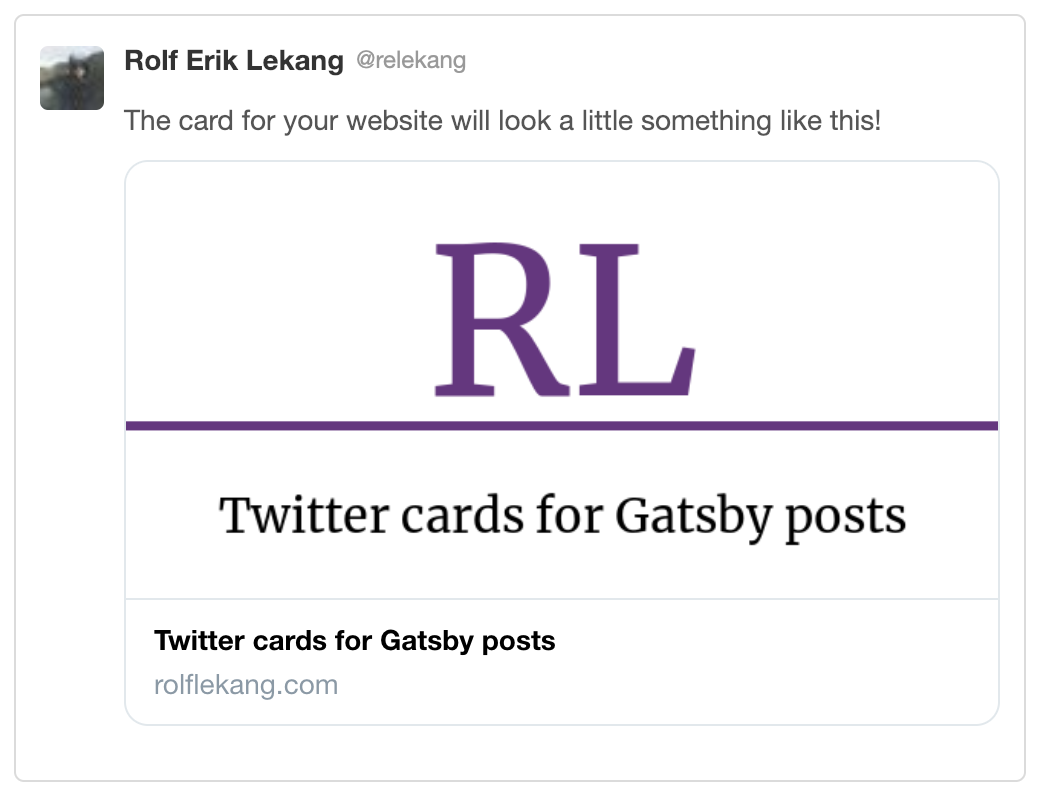
Posted 26.02.2019 · 4 min readPreviously this blog had the default article twitter card. I have seen some other sited like dev.to have these nice title images for the twitter cards. I wanted to add these to this site for two reasons: they look kind of nice and I would like to look into what it would take to create these. The idea I had for my own cards was for it to resemble the current header with RL and the purple line and then the title of the post below it. This first version was written with Node.js and node-canvas, maybe in the feature I will try to convert it to native reason. Here is a preview of the twitter card for this post.

Twitter has a tool to validate the cards for different pages. It will show how the card will be viewed in a tweet. Below is an example with this post.
So how to build this? Two things is necessary to get this to work. Creating the image and then add the meta tags to each posts according to the twitter documentation.
Firstly, let us look at the creating of the images themselves. node-canvas
is a nice tool to do drawing in Node.js that we want to store in a file. It
can do many of the things possible to do with browser side canvas. Below is
the implementation of the card for this site. What parts each section draws
is put in comments above them. In the end of the function the
canvas.toBuffer('image/png') function is used to create a buffer that we
can write to a file, which then is written to the file.
const { createCanvas } = require('canvas');const fs = require('fs');
function createLinkCards({ title, path }) {  const canvas = createCanvas(600, 300);  const context = canvas.getContext('2d');
  // Create a white background  context.fillStyle = 'white';  context.fillRect(0, 0, canvas.width, canvas.height);
  // Create the big RL in purple  context.font = '100pt serif';  context.fillStyle = '#6C3082';  const header = context.measureText('RL');  context.fillText('RL', (canvas.width - header.width) / 2, 160);
  // Create the purple line across the image  context.strokeStyle = '#6C3082';  context.beginPath();  context.lineTo(0, 180);  context.lineTo(canvas.width, 180);  context.lineWidth = 6;  context.stroke();
  // Insert the title text beneath the purple line  setFontSizeForWidth(canvas.width * 0.75)  context.fillStyle = 'black';  const text = context.measureText(title);  context.fillText(title, (canvas.width - text.width) / 2, 250);
  fs.writeFileSync(path, canvas.toBuffer('image/png'));};
There are a few things to take a closer look at. Several places
context.measureText is used. It will take use the current font config to
measure how wide the string passed as the first argument will be. This is
useful to center the text since we can use it to calculate the placement of
the text. Furthermore, it can be used to decide the font size if we do not
know the amount of text to render beforehand. In this case, that is done for
the title with the function below, which will test any font size from 100pt
and downwards until the text fits within a certain limit. In the case of the
card title it is set to 75 % of the canvas with.
function setFontSizeForWidth(context, width) { let fontSize = 100; do { fontSize--; context.font = fontSize + 'pt serif'; } while (context.measureText(title).width > width); return fontSize;}
The next thing needed is to call the createLinkCards in the same place
where createPage is called in gatsby-node.js. In this example I have used
gatsby-transformer-remark the code snippet below is looping over the result
of the graphql query similar to the documentation for
gatsby-transformer-remark.
posts.forEach(({ node }) => { const { slug, layout, tags, title } = node.frontmatter; createPage({ path: `/${slug}`, component: path.join(templatePath, 'blogpost.js'), }); createLinkCards({ title, path: path.join('public', `${slug}-link-card.png`), });});
After running gatsby build the public folder will now have a link card file
for each post. Open one and check how it looks. Next step will be to link this
in the blogpost template. These things needs to be linked in meta tags in the
head tag. To change metadata with Gatsby it is recommended to use react-helmet.
There is a [guide on how to change metadata][gatsby-docs-metadata] in the Gatsby
documentation. In the component in the blogpost.js template add the following
snippet of code.
<Helmet> <meta name="twitter:title" content={title} /> <meta name="twitter:card" content="summary_large_image" /> <meta name="twitter:author" content="@<your twitter handle>" /> <meta name="twitter:image:src" content={`${window.location.origin}/${slug}-link-card.png`} /></Helmet>
This is all that is needed to get these nice cards in tweets with links to your blog. It might be worth looking into more meta tags for getting the same behavior on other sites that have similar functionality. Remember that twitter has a tool to test your new cards.